Intro
It is now almost a 1/2 century since the first Sisson Kayak was made. Many are still in regular use. Several times we have come close to making a manual to cover the care of our boats. From unwrapping your new boat, to getting in, caring for the finish, and of course fixing the hull should the need ever occur, you will find instructions and tips (plus a whole lot of Grahame’s humor) in this Manual. Enjoy!
‘Pulled’ from original website file – restoration started. May 2018.
Kayaking is an activity done on water. Any water deeper than 1mm should be considered dangerous to your health. All Sisson Kayaks are designed and constructed in a manner to minimise your exposure to the risk of a water related accident provided always that the paddler-of-the-moment contributes operating procedures of proven merit. It is solely the responsibility of any kayak paddler-of-the-moment to ensure that the kayak, honest skill level and the choice of water are matched in such a way that zero swimming takes place. Sisson Kayaks manufactures a wide range of kayaks so that any paddler is able to choose a boat that will maximise their on-water safety. Sisson Kayaks does not warrant or promise any kayak in the Sisson Kayak range to be ‘safe’ without the addition of harmonious safe paddler behaviour.
On-water safety remains solely the responsibility of the paddler of the moment who should memorise and facilitate the following 10 commandments:-
1. Avoid turbulent water (that the paddler would not by choice go swimming in) beyond their (non-ego driven) skill level.
2. Avoid narrow (fast?) kayaks beyond their (non-ego driven) skill level.
3. Be totally honest to themselves at all times about their true skill level. That skill should include the ability to conduct a self rescue on open water, proper approach to the bank of a moving river and group rescue techniques on any water.
4. Never paddle alone if items 1, 2 & 3 (listed above) are in any way questionable. Remember always the old 1970’s (overlooked by too many these days) rule “Less than three there should never be”.
5. Accept that ZERO SWIMMING (out of training situations) is kayaking.
6. Always maintain the flotation installed by Sisson Kayaks Ltd (foam blocks, airbags and/or compartments/hatches) in such a way that the kayak will always stay afloat as (Sisson Kayaks Ltd intended at the time of delivery) if capsized and flooded.
7. Avoid coastal trips organised by ‘friends’ who just want to show their superior surf skills off while the invited paddler gets ‘trashed’.
8. Avoid the entering of races that by repute, are always a bigger ‘Adventure’ than the race director intended.
9. Avoid trees, bridge piers, rocks, dead cars, flood protection works and any other known item that may snag the paddler or the kayak.
10. Always watch for changed weather conditions and have a ‘Plan B’ alternative course of action worked out well in advance.
Sisson Kayaks Ltd manufactures their kayak range to provide a realistic, and skilled paddler with the maximum enjoyment and performance. Sisson Kayaks Ltd accepts no responsibility for any misuse (as listed in items 1 thru 10 above) of the kayak. It is the sole responsibility of the paddler of the moment to protect himself or herself from all known and published dangers of kayaking not mentioned in the ‘commandments’ above.
Always wear a P.F.D. (lifejacket) True story.
The first time I paddled a my brand new Slipper kayak down a creek in 1975 I ran aground on a large boulder that was part of a rock jam above a deep pool. Getting out of the Slipper (wrong technique – slimy rock) I slipped and ended up in the deep pool with the boat locked onto my heel (behind hipboard) and knee (under the coaming). I almost drowned as the boat and I slithered into the pool below! Even with a P.F.D. on.
Now – just in case you skipped the “Warning! Advise Liability Disclaimer” above – I hit you again:-
Never kayak alone.
Maintain the foam buoyancy blocks.
Maintain the compartments and hatches.
Kayaking requires skills.
It is the sole responsibility of the paddler to ensure that the skill level matches the kayak model being paddled. In New Zealand there are many coaches providing and certifying Grade 2 river skills. This certificate (and its required skills) should be seen as the minimum requirement to a safe and enjoyable experience.
Now to the fun stuff.
Two minute crash course in kayak construction
Your Sisson Kayak outer surface consists of about 0.25mm of coloured polyester Gelcoat that was sprayed against the surface of our polished mould where it later ‘gelled’. The spray direction is too inacurate to allow ‘fancy’ multi-colour arrangements as can be done with paint. Later, fibreglass (fibres of glass in mat, woven strand or unidirectional form) Kevlar (up to five times stronger and 1 time stiffer) are laid into the mould wetted out with polyester resin. Where and how the fibres are placed changes the strength of the kayak. Where and how the resin is applied changes the strength. As the resin cures to full hardness it also cures the ‘gelled’ gelcoat. It takes knowledge and skill to make a light strong kayak. We have made in excess of 12000 kayaks.
Our packaging policy
Sisson Kayaks are shipped in ‘minimalistic’ packaging. We have tried all types and from heavy wooden crates (which get crushed when a truck engine is stacked on top!) to just one layer of plastic. We see over packaging as a gross waste of the earths resources. Practical experience has lead us to the packaging mix we currently use. It works! It is light enough that one person can still lift (rather than drag) the kayak off a truck. Exported kayaks come with a double layer of polytube and are bound with cling wrap. We also tape sandpaper to the bow and stern of the hull. If a stevedore drags the boat – he sandpapers the floor!! Exported single sea kayaks can be shipped inside cardboard cartons while the stock of cartons remains. An extra charge applies to both exporting package options. All kayaks are shipped with a 1.5 metre length of rope protruding from each end.
Upon delivery at your home
Always check the boat for damage before signing the waybill. Don’t worry about a tiny scratch, but do note any breakage on the waybill before you sign. Lodge any claim directly with the freighter quoting the waybill number off the form you signed.
Unwrapping
After the packaging is removed there will be marks on the boat where the packing tape has parted from its adhesive. These marks are easily removed with Methylated Spirits or any Citrus based cleaner. Do this job outside away from ignition sources. Do not smoke.
Get it wet
Your kayak has never been washed on the inside. It is strongly recommended that you wash the interior with lots of water to remove any fibreglass dust that remains from the manufacturing process. This will minimise your experience of the “Fibiglass-itchy’s”.
Seats
Some seats are adjustable fore and aft. Initially adjust the seat into the central position. Fixed seats are made to suit most paddlers. If you find the fixed seat uncomfortable – modify it. More on seats later under the section Trim
Footrest adjustment
Set up the footrest so that you have more room than you think you need. Most people adjust their footrest too tight initially. After 2 hours on the water tight footrests can promote great discomfort. For long paddles such as the Speights Coast to Coast your footrest should be loose enough that you can let your knees down to touch the hull with the foot still in a relaxed position.
Rudder cable adjustment
After adjusting your footrest you will need to adjust the rudder cords. Adjust each cord so that the rudder is central when the control device is central. The cords should be tight but not stretched over-tight.
Spraydeck
Sit your boat on the lawn. Sit in the cockpit wearing your spraydeck and buoyancy aid. Fit the spraydeck and check that you are happy with the way it releases from the coaming when you pull the tab. Make sure that your buoyancy aid does not force down the spraydeck. Try working the rudder. Move about pretending that you are paddling. Feel for pressure points against the boat. Are they caused by your clothes? Are they caused by the boat? Change your clothes or pad the boat with closed cell foam.
Storage (long term)
Always consider two things. Constantly wet fibreglass absorbs water! Ultraviolet light degrades resins and weakens Kevlar fibres! So – always wash all salt off your boat before you store it in a dry, airy shaded location. Once a year a coat of car wax prolongs the manufactured polished surface. Leave the hatches off (or loosely fitted) sea kayak compartments.
Storage (short term)
Never allow your boat to become a leaf infested, waterlogged ‘fishpond’! Store upside down in a shaded area.
Roof racking
New Zealand Police are becoming more agitated about the enforcement of loading rules. Over the summer of 2002/3 they prosecuted hundreds of otherwise law-abiding drivers who were heading off on holiday with improperly loaded boats etc. Enforcement of car-topping rules will likely follow. Consult the Rode Code. Here is an overview of car-top loading rules.
- The load may extend forward from the front edge of the drivers seat no more than 3 metres
- Taking into account the above rule, the load must not extend more than 1 metre forward of the front of the car.
- The load may extend rearward from the axis of the rear axle no more than 4 metres.
- Taking into account the above rule, the load must not extend more than 1 metre rearward of the rear of the car.
You may need to buy a longer car! You may need to have a forward support engineered onto your front bumper! Stay legal – otherwise your insurance may be void.
Always use a reputable rack that is approved by your vehicle manufacturer. We stock Frontier, Mondial and Nomadic racks and accessories in the Paddles ‘n’ Stuff section. Some cheap racks are unsuitable for kayak use. Ensure that the cradles support and do deform the hull. The hold downs must be tight but not so tight that they deform the deck. On long high-speed trips the bow and stern should be tied down to the front and back bumpers with a thin cord. These cords reduce the wind loading on the kayak, the rack and the roof to rack mountings.
Sea kayak / Skevolution transportation
Sisson sea kayaks (plus some other brands we sell our hatches to) fitted with moulded rubber hatch covers are pressure tested for leaks during assembly. Some compartments (others may have minute pinholes that some customers identify and fill) are actually totally sealed. These kayaks with sealed compartments are subject to damage if the atmospheric pressure changes due to weather change, high altitude car journey or air transportation. In such cases the seal of the hatch lid should be ‘upset’ by placing a short length of cord over the face of the hatch ring before the hatch cover is fitted. Kayaks have be destroyed by atmospheric pressure change alone.
Cosmetic care
Wax
In parts, Paul Caffyn’s 1982 Australian circumnavigation Nordkapp still has ‘new’ looking surface. This is because Paul applied many coats of wax to the boat before, during and after the trip. Wax does help stop gelcoat scratching. Wax stops surface oxidation. Wax slows UV attack.
Vim / Jif / Brasso
If your kayak has become dirty from improper storage a liquid kitchen sink (mildly abrasive) cleaning agent will do a great job of restoring the appearance to near new. Vim / Jif does a great job when you need to clean up a scruffy boat that you just purchased second hand. Brasso is a very good cutting compound for restoring a high polished surface to gelcoat surfaces.
Wax
Any furniture or car wax is OK. However those containing Carnauba last longest. Automotive products such as Armoral and Wynns Revive are great to protect and extend the life of hatch covers etc.
Fibreglass
Any structural fibreglass repair on your kayak should be done using only polyester resin. Polyester resin will never cure (set and go hard) in the presence of salt crystals, dampness or water. Treat salt as the enemy! Always thoroughly wash you boat inside and outside with copious quantities of fresh water. Remove any foam pillars or airbags from the damaged area. Then allow the boat to dry in the sun / wind. Never use epoxy resin to repair a polyester built kayak. If you are not already skilled in the use of fibreglass, take your boat to a professional who already is. Don’t offend your repairer by expecting him to wash the seawater and salt crystals from your boat. The professional wash and dry will surely add to the repair bill. If you must do your own repairs, a tip:- most bad repairs fail due to poor preparation of the surface including fibre glassing over salt crystals (water film). Others fail because too much catalyst (hardener) is added in the mistaken belief that the resin will cure faster. In fact too much catalyst just dilutes (stuffs!) the polyester resin.
Dents
If your kayak ever becomes dented in storage (hot rafters in summer) you cane easily make the boat straight again. The resins used to make Sisson Kayaks have a heat distortion point of 75C.
You need the following:- Two rope loops from the rafters to act as a kayak rack, a plastic bag with 1kg a sand sealed inside, a hair drier.
Orientate the kayak in the racks so that the dent is at the bottom place the sandbag inside the kayak over the dented area so that it tends to push the dent outwards. Warm the dent with the hairdryer at the same time moving the sand bag about. When the dent is out discontinue the warming and leave the boat to cool back to room temperature. Take out the sandbag and the dent should be gone. If not – try again – but with a little more warmth.
Scratches
If you are worried about scotches on your new boats gelcoat, there is only one course of action. Sell the boat fast and give up kayaking! I am serious. Fact – your boat is bound to be scratched. It shows that you are enjoying it. Just relax and enjoy. P.S. under hull scratches for and aft in line with the keel indicate that you are a gun! Scotches across the hull indicate a timid sole. Impress your friends. Instigate a few good fore and aft scratches.
Gelcoat chips
These will appear as your kayak impacts onto rocks or gets blown across your yard. Relax. The exposed fibreglass is just the other side of the structural layer that forms the inside of the hull / deck. Kayaks are only exposed to water on an intermittent basis and the fibreglass structure is unaffected by the water contact. Bigger fibreglass boats kept always in the water do suffer from the constant water contact. Permanent 100% time-weighted water contact is the problem. Even Paul Caffyn’s Australian circumnavigation Nordkapp (used solidly for 360+ days in row) suffered no damage from water contact. This is because it spent its nights ashore. The time-weighting was only about 50%. Gelcoat repairs on a kayak are only needed for cosmetic reasons.
Fibreglass/Kevlar structure broken
Scroll down for full advice on this procedure
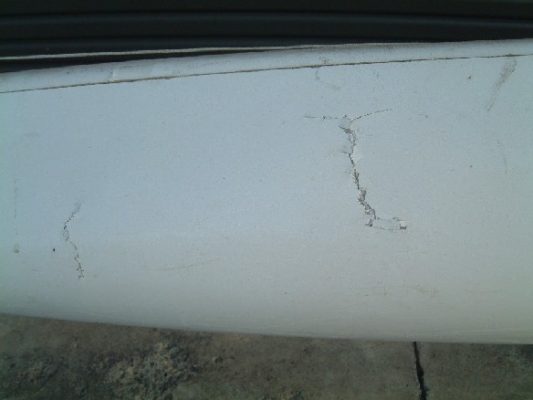
Crunch (small area) with gelcoat stress cracks
Apply some ‘Duct-tape’ or a sponsors label and have fun!
Crunch (large area) with extensive gelcoat stress cracks
Have the crunched area repaired and apply sponsors labels over the stress cracks – enjoy!
Hole through the deck
More sponsors labels needed!
Hole through the hull
Should be repaired by someone who understands kayak repair.
Skidded and somersaulted down the motorway at 140kph.
Repair the holes and crunches structurally – and enjoy the wonder of your friends who will just assume that you survived a trashing on big water.
Snapped in half just to get it off the willow tree wrap.
Don’t throw the two bits back into the river in anger. I have rejoined dozens of kayaks that were delivered to the factory looking like two nestled ice-cream cones! The Speights Coast to Coast has been won in such boats.
Fibreglass repairs
It is generally beyond the scope of this manual to teach the art of fibre glassing. However we do offer a step by step guide on major boat repair further down this page.Get a book from the library if you want to learn more and do your own repairs. But be warned, tradesmen spend hours grinding out the ‘repairs’ of ‘experts’. All Sisson Kayaks are manufactured using non carcinogenic Polyester Resin. All repairs to Sisson Kayaks should be done using only Polyester Resin. Epoxy resin must never be used.
Eliminator / Esprit / Centrix under seat foam block.
All of these kayaks are constructed with a square (60mm x 60mm) foam block glued between the seat and the hull. Sometimes the glue fails and the block falls out. This leaves your seat weak and subject to breakage. This also leaves the hull with less support when you skid over rocks. Check your kayak now. If the block is missing glue a new one in using Fullers Max Bond which can be obtained from any good builders supply company.
Multisport kayak seam tape replacement
We use Scotch (3M) 471 Scotch Electrical Insulation tape for covering the seams on these boats. Sometimes we use similar tape made by other manufacturers.
To clean off the old tape warm the area gently with a hairdryer and scrape the old tape off with a sharp piece of ‘Perspex’ or other hard plastic sharpened like a chisel. Clean the area around the seam with Methylated Spirits. Allow to dry fully. Remove the Meths from the work scene for fire safety reasons.
Apply the tape to the seam pressing it against the actual join lightly. Do not press it down hard! Work your way right around the boat so that the tape is overlapped at the join (at the transom stern). Working with a soft pad of folded cloth in one hand and the hairdryer in the other, work along the tape warming and pressing down the tape. If you use the correct technique the tape will bond firmly to the boat with minimal air blisters. Check for blisters. ‘Pop’ them with a pin and press down expelling the air. Reapply heat to make the adhesive bite fully. Good luck!
Gluing foam (and other custom goodies) to the inside of your kayak
Many ‘waterproof’ contact glues are useless. They used to work. However since the ozone depletion forced the banning of certain industrial solvents, the most recent versions using alternate solvents are under performing. There is a better type of glue. Go to a builders supply outlet and purchase a cartridge of builders construction glue. In New Zealand the best brand is FULLERS MAXBOND. This is what we use. Make sure that the surface is clean of all body grease, urine crystals and harbour oil slick deposits! Wash out with fresh water. Dry thoroughly. Clean with Methylated Spirits on one rag and wipe of (in one direction – once) with another rag. When the Meths has dried you can start gluing.
Flotation Foam Blocks
These blocks must be kept in good condition – not only to provide reliable anti-sink buoyancy for the kayak, but to also provide structural compression strength for the hull and deck. Many old kayaks sold second-hand have foam blocks that no longer work. If you have an old Sisson Kayak that needs new foam blocks we can mail you a set of full-size patterns so that you can make your own quickly and easily. The cost including postage and GST is $20.
Rudder Cords
Multisport kayaks leave the factory fitted with 2mm Polyester cords. Some people think these cords are nylon! Wrong!! Nylon stretches too much!!! These cords should be replaced every 2 years or before a big race. We sell polyester replacement kits Code : SK160
The Voyager leaves the factory with Spectraspeed cords. We sell upgrade/replacement kits Code : SK161
Most other sea kayaks leave the factory with Stainless Steel 2mm rigging wire that has crimped end fittings to last a lifetime.
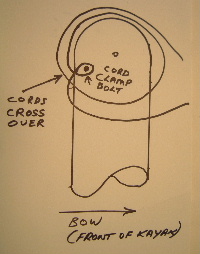
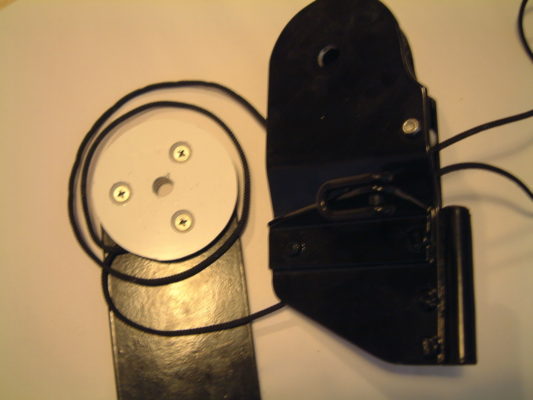
Sea Kayak Rudder Retraction Cord
To replace this cord – please follow the patterns shown in the following photos
Footrest fasteners may be subject to electrolytic attack!!!!!
Electrolyses is the bane of every Navy in the world – so why should a sea going kayak be immune?
The human body is a ‘battery’ when sitting in a kayak on the sea. The electrical current produced by the paddler will accelerate the corrosion of metal fastenings in the footrest.
Some early sea kayaks with footrests that are not connected to the hull exterior (fastening bolt heads through the hull – earthed), can be subject to accelerated, hidden corrosion. After 7/8 years the system may fail. Be warned!
Check your rudder system fastenings every 5 years. Replace all pop rivets (if the footrest is not earthed through the hull) with 316 grade stainless bolts and nuts. Stainless steel bolts of 304 grade are liable to corrode because 304 is not made to withstand sea water exposure. Stainless 316 bolts are the only ones made for the marine environment.
Kayak storage
Some active paddlers store their kayak on top of their car. Always wash all sea water off the inside and outside before putting the boat on the rack. Sponge out the surplus fresh water. Keep a cockpit cover on the boat.
Never store your kayak for long periods with salt water on the inside. It will never be dry. The resin will absorb water. Your boat will get heavy. Fact – on a 14 day boil test, resin will absorb 6% of its mass in water. Polystyrene blocks suck up even higher percentages. Store dry and away from the sun with a cover over the cockpit.
Rudder quadrant mountings
At sometime you may want to remove the quadrant for repairs and the bolt is locked tight. Here is the way to proceed. All of the rudders mounted to our Multisport kayaks are fastened by a 12mm stainless steel (1/2″ pre 1997) bolt. This bolt is fastened into a aluminium nut about 70mm long that is cast into the end of the resin using a flexible resin. After time the sea water electrolytic action (no sacrificial anode fitted) may cause the bolt and nut to become locked as one.
Proceed as follows. Warm the whole end of the kayak with a hair dryer. The temperature must be still less that comfortable to touch with your hand. Lock some Vicegrips to the bolt head and move the bolt loose with slight movement in one direction. Now repeat in the opposite direction and so forth at the same time pulling up on the Vicegrips. Like pulling a tooth!
The whole lot, bolt, nut, quadrant and aluminium nut will come away from the boat. Now rest the aluminium nut on a vice and tap the other side with a hammer. Apply a little CRC and do the same again. Next warm just the aluminium nut and it is time to unscrew everything.
Apply masting tape around the socket (that’s what a dentist would call it!) hole in the boat and mix 10cc of polyester laminating resin. Take care not to over catalyse this resin. Pour the resin into the socket. Push the aluminium nut back into the socket displacing the surplus resin over the masking. Leave 24 hours to cure. Reassemble the rudder.
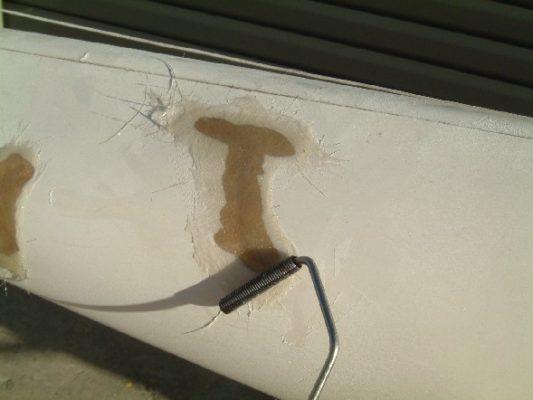
Fibreglass/Kevlar structure broken
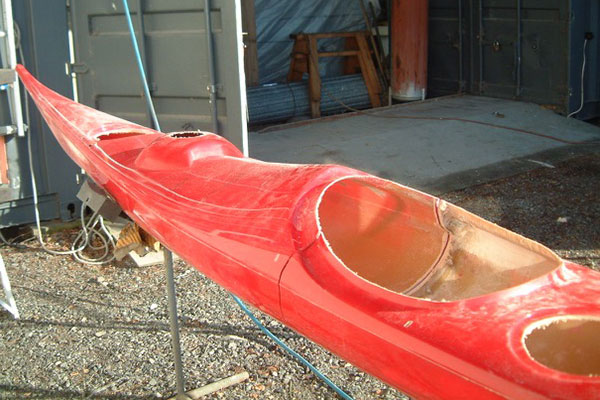
So you broke your boat and lost a good nights sleep. In reality the insomnia was probably your worst problem because, chances are, the kayak will repair structurally just fine. For example Steve Gurneys famous ‘Trevolution’ was actually slapped up using the (crumpled) bow of one wrecked Evolution, The stern of a crushed Evolution with a new bit in the middle! The word structurally above is highlighted for a good reason. Your badly wrecked kayak has about the same coloured surface area as a Porsche 911. To repair the whole surface back to new appearance may cost about the same as repairing a wrecked Porsche 911back to good appearance! Check out the headings below.
Here we see a broken Evolution
Over the next little while I will be showing the easy way to repair this kayak (to training boat standard) at a cost that is affordable. Sisson Kevlar boats repair very easy.
The repair shown below was carried out on the 18th June 2003 (mid NZ winter) between 2pm and 3.30pm. The air temperature was 14C. A heater was used to accelerate the sanding hardness of the slushcoat. Although the photos deal with the right-hand crack – the left hand one was repaired at the same time. The finished repair adds only a few grams to the weight of the kayak. The finished repair has 100% of the strength of a new kayak. All of the repair was performed from the outside!
Proven repair technique!
- In 1994 Steve Gurney won the Speights Coast to Coast using a ‘Chicita Banana yellow Evolution Classic that had been snapped in half weeks earlier.
2. In 2002 Daniel Busch took out the fastest paddle section at the Speights Coast to Coast using an eight year old Evolution Edge ‘dunga’ that Graeme Causer had snapped in half on a bridge pier 7 years earlier!
You need a 4″ grinder with 36 grit disk and a random orbit sander with 36 grit ‘3M Stickit’ plus 220 grit ‘3M Stickit’. Random orbit sander can be air or electric powered (Ryobi One grinders and sanders work well)

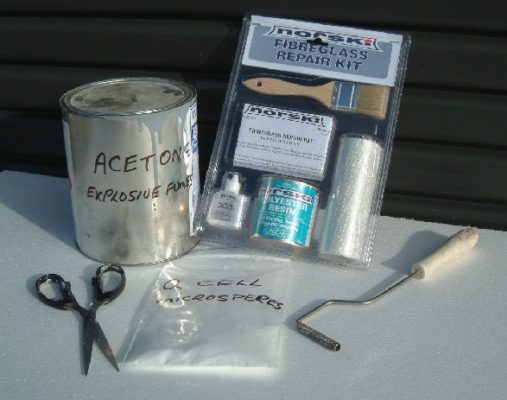
You also need a Polyester Repair Kit, a small FRP roller, some acetone for cleaning the brush (or just throw away the cheap brushes), and some old scissors to cut the Chopped Strand Mat (CSM). The plastic bag contains the white powder (never take this through customs!) Q Cell Microspheres that will be used to make the resin ‘slushcoat’. You also need some Barrier cream on your hands. Some kitchen paper towels are also handy for cleaning resin off this and that. Any resin on any valuable items (your wrist watch or celphone) can be cleaned off with Methylated Spirits – even after it is hard.
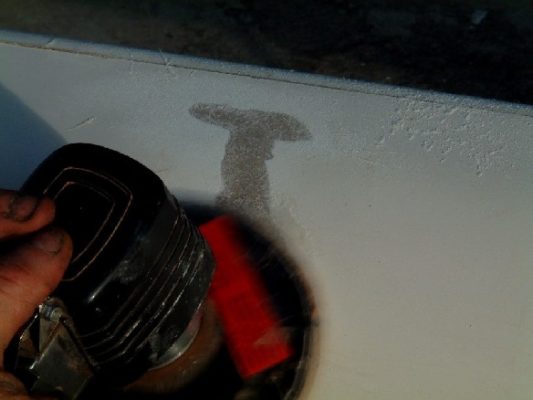
Using the 4″ grinder scarf away all fractured fibreglass and gelcoat. The scarf must be made no wider than necessary to get a solid substrate in the CSM component of the kayak lay-up to rebuild on. Grind carefully down to the Kevlar level so that it just starts to ‘fluff’. Note:- even in the horrific event that this kayak suffered, most of the Kevlar has harmlessly ‘hinged’. Only a few small areas has fractured Kevlar under the fractures.
This is what it should look like. Do not sand or grind the gelcoat adjacent to the ground out scarf – leave it shiny.
Resin poured into paper cup. Catalyse with 2% MEKP (Hardener). Follow all FRP kit safety instructions.
Cut the CSM into narrow strips and make the length less than the ground scarf
You also need some Barrier cream on your hands. Some kitchen paper towels are also handy for cleaning resin off this and that. Any resin on any valuable items (watch) can be cleaned off with Methylated Spirits.
Using the brush, pre-wet the CSM with resin, using cardboard as a disposable work surface.
CSM must be all ‘wet’ with no ‘dry’ patches. Before the CSM binder (that hold it together) dissolves, pick up and place the glass over the ground scarf areas. Build up 2 or three layers so that the layers are proud (above) the surrounding gelcoat surface.
Roll the CSM to remove all air bubbles. Jiggle the action to ‘pump’ resin down into the fluffed up Kevlar. To finish off, used the roller to gently ‘bulldoze’ the surface to an even height.
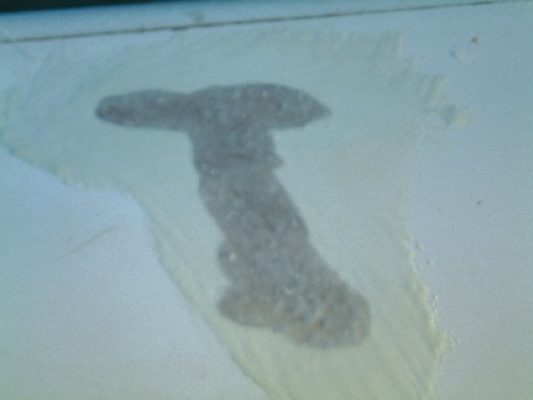
Leave in the (winter) sun. In summer work and keep the kayak in the shade. When the resin has ‘gelled’, not sticky to touch, but still like rubber, sand down to the gelcoat level using the random orbit sander with the course 36 grit 3M Stickit disc. The surrounding gelcoat will now also be abraded with course scratches.
This is what it should look like. The sanded CSM is slightly fluffy on the surface. Repaired structurally solid and the resin is still setting hard. Strength-wise this will be as good as new. Now to the next job is filling the porosity in the CSM glass and filling the gelcoat scratches.
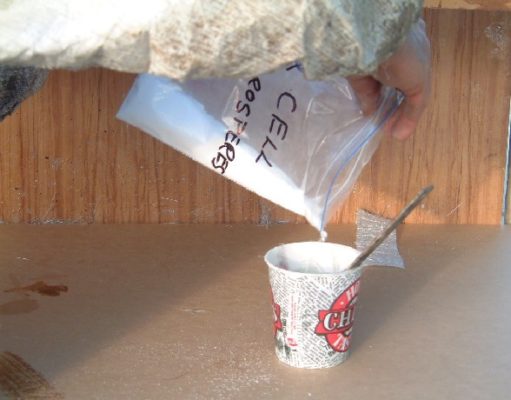
Catalyse a small amount of resin and add the Q Cell Microspheres and stir in to make your slushcoat. Add more Q Cell until the consistency will stick to a removed stirring stick
Like this. And then use an old brush to apply ‘slushcoat’ to the whole area that has been course sanded. ‘Scrub’ the Q Cell this-way-and-that with the brush in order to ‘pump’ it into any porosity in the CSM repair.
Peel off the 36 grit 3M Stickit disc
Apply the 220 grit 3M Stickit disc
This what the ‘slushcoated’ repair should look like. Now leave in the (winter) sun. In summer work and keep the kayak in the shade. When the resin has ‘gelled’, not sticky to touch, but still like rubber, sand down to the gelcoat level using the random orbit sander with the fine 220 grit 3M Stickit disc.
Use the random orbit sander to make the whole surface smooth. feather the edges out onto the surrounding gelcoat. Do not sand too deep. It is best to finish sanding when there is still a very thin layer of hard ‘slushcoat’ over the CSM. Go to deep and you will have pin-holes in your finish layer paint or gelcoat.
This is what my ready-to-gelcoat (white repairs) or ready-to-paint (colour repairs) looks like. Strong, fair shape and free of porosity.
So here you have a Kevlar kayak repair all structurally finished in 1.5 hours on a mid winter day. This would be finished in 45 minutes in mid summer even keeping the kayak in the shade.
I will add more to this section relating to the applying of the auto lacquer, sanding and buffing.
On-water kayaking tips
Sea kayaks
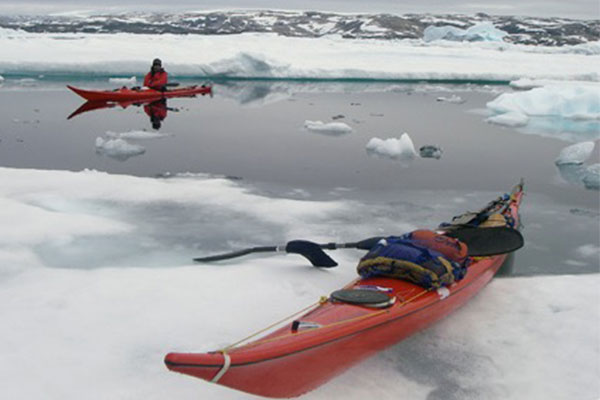
There has been so much written about sea kayaking that is basic rubbish. Here is our short introduction message. 1/ Take a Grade 2 river instruction course (get your skills up) 2/ Understand and fully believe that there is no such thing as a “freak wave’ (news media bumf- surfy’s wait hours for one of these ‘normal’ big wave sets to come through) at sea. 3/ Pack your gear into your tramping pack! Pretend that you are going tramping! Unload your pack into your boat – add a few fireside goodies. Avoid overloading your Seakayak. Pack the compartments so that heavy items are close to the cockpit and light items at the ends. Distribute the weight so the trim is neither bow nor stern down. Understand fully that wind is the real enemy at sea. Take advise on the weather before you leave. If you want more than my minimalistic advice, contact KASK and buy a copy of their ‘Little Red Book – HANDBOOK.
Advanced Double Sea Kayak directional control
Some paddlers of double sea kayaks ask for larger rudders after they have experienced directional (broaching) control problems in rough seas. Sorry, it is impractical to mount rudders so long (that the blade is always in the water) or strong (that the rudder can force the speeding foil of a racing hull into a different direction) that all directional control can come from the tip of the toe!
Racing double (travelling fast) paddlers need to hone two quite separate skills for perfect control in all conditions. Firstly, the leaning of the hull to the outside of the turn will make the bilge ‘rail’ a carved turn. This works fine in moderate conditions. In harsh conditions the bow paddler needs to borrow some Open (Canadian) Canoe control strokes. There are some good books on these. Even better, there is an excellent video made by Bill Mason in Canada that clearly teaches these strokes. In the video you can witness an open canoe travelling through ‘impossible’ conditions with very little effort. The bow paddler uses pry, draw and (most important) bow-rudder strokes as commanded by the stern paddler. Bliss – retract your rudder – go faster!!
Trim (for and aft) of multisport racing kayaks
Trim is the best kept secret of winning racers. And yet there is no such thing as a perfect trim for all events. Top racers actually change the trim of their boat to suit each race event. How? 1/ Identify the heart rate that you can sustain in the upcoming race. 2/ Paddle past a friend (standing on the shore) at your racing heat rate (warm-up first) in water at least 2 metres deep. Your friend must observe the stern of your kayak. At your racing intensity it must be above the water. If the stern is buried – the hull drag has increased – move the seat and footrest forward. Do the test again until at race heart rate your boat is in race trim! Some Evolution paddlers move their seat 250mm forward (and wear their spraydeck back-to-front) to race a 30minute event. For a 5 hour race the seat goes back 250mm.
Customising your seat
The seat supplied in your boat should be considered the starting point of the one you will make to fit your own unique shape. Multisport champions such as Steve Gurney spend hours customising their seats. Proper seat preparation is a large reason for their high performance on the water. Remember, their is no such thing as a British Standard Bottom! No manufacturer can make a seat that suits everyone. It is up to you to make your seat work for you.
Multisport kayaks such as the Evolution come standard with a seat pan. This pan is not meant to be the full seat. The owner needs to glue (Fullers Max Bond from a building supply firm) foam up the sides of the hull and just onto the seat pan. The foam needs to be just thick enough to stop the hips moving sideways when the boat is tilted 20 degrees over. Then at the top you need to glue in foam ‘hip blocks’. These should be wide enough that you have to push lightly to get into the boat, but high enough that they are loose when you are seated. Think of your bottom as a clothing dome. It ‘clicks’ into your boat. But once you are in the seat you are loose and chafe free!
General Tips
Need a rope urgently?
All Sisson sea kayaks are fitted with deck lines. These are not spliced, just knotted. If you are ever in need of a rope to assist your survival – remember where you can quite quickly get a 10-12 metre rope.
Car-topping safely
In general, any good quality roofrack (ask around there are some bad ones on the market) will carry a metre racing boat safely are your hometown. However, open road travelling brings new problems that may overwhelm your roofrack. High speeds = high stopping forces. These can pull the whole rack off the car – especially if your (sports) car has a short roof. In addition you can strike fierce wind forces that can tear at your boat. Some double Sea Kayaks (such as the Southern Light) have weights near the limit of a typical roofrack. Read on.
*
When travelling at open road speeds, always tie your kayak, bow (front) and stern (that’s the back!) to the front and back of your car using strong cord. This is in addition to the fastening to the roofrack.
*
When car topping heavy double kayaks arrange for a tow-bar extension to be made by an engineer. The extension needs a ‘V’ on the top that fits under the kayak stern. When the kayak stern is lashed down onto this tow-bar extension the boat is held firmly under heavy braking etc. The roofrack always just carries the load.
*
NEVER USE ‘STRETCHIES’ OR ELASTIC ROPES TO HOLD A KAYAK ON YOUR ROOFRACK. Hooks let go and take out eyes!!! Rubber stretches and kayaks fly!!!! Yes – these things have happened!!!! Lethal stuff!!!!!!
*
Never exceed 320kph (200mph) with a kayak on your roofrack. The gelcoat will exceed its heat distortion point and it will blister. Such over-eagerness to reach the water will void the warranty on your kayak, roofrack and car! (just joking)
Sisson Kayaks
Email (best contact option) grahame@sissonkayaks.co.nz
To be continued – Haha